Public (External) Forms
Last updated 25 May 2026
A form is External when its Form type was set to "External" at creation. You can't change a form between External and Internal afterwards, see Creating a form.
The URLs Flexie gives you
Every External form has a unique identifier and a small set of URLs built from it. You find these on the form's view page (/forms/view/{id}):
| URL | What it is |
|---|---|
/form/{identifier} |
The public form page. Open this in any browser and you'll see the form ready to fill in. |
/form/push/{identifier} |
The submit endpoint. The form posts here when you click Submit. |
/form/upload/{identifier} |
The file-upload endpoint. Used internally when a submitter chooses files in a File Upload field. |
/form/attachment/{hash} |
The download endpoint. Opens a previously uploaded file. |
/load-form.js?idf={identifier} |
The embed script, see Embedding below. |
You don't need to use any of these directly; they are all wired together. The two you'll share are the public form page (to send people directly to it) and the embed snippet (to put the form on your own site).
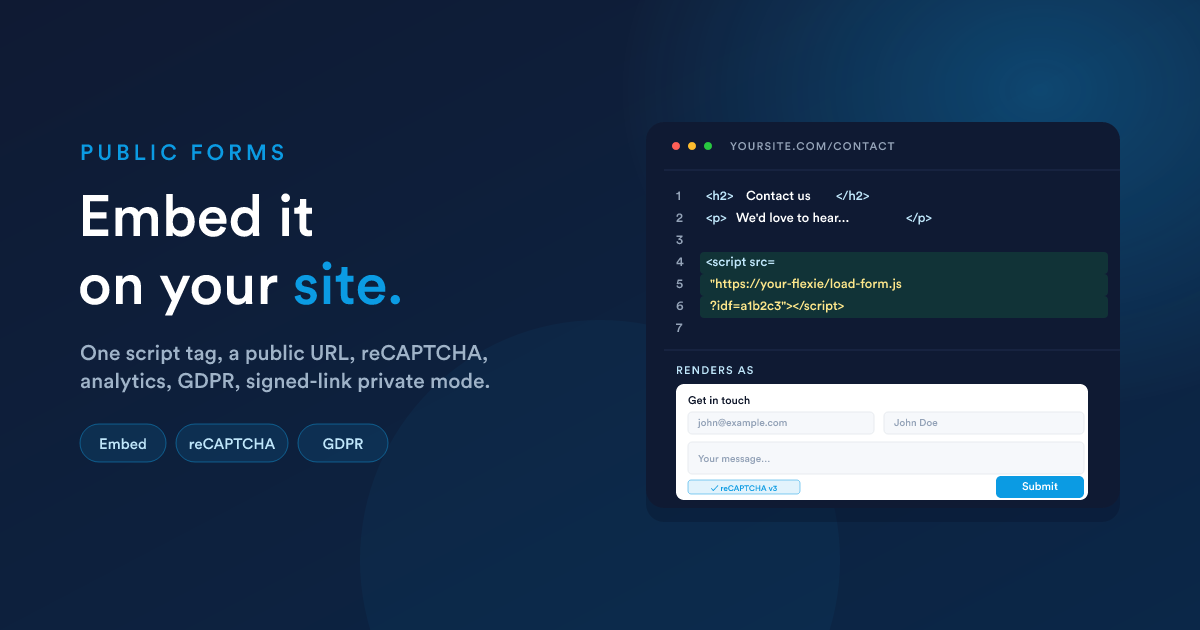
Embedding the form on your website
The embed snippet is a single line. Open your form, copy the embed code, and paste it where you want the form to appear:
<script src="https://your-flexie/load-form.js?idf=<your-form-identifier>"></script>
What happens when a visitor's browser hits a page with this snippet:
- The script downloads from your Flexie instance.
- It creates a
<div id="ff-{identifier}">placeholder at that spot. - It loads the form's structure and renders the form into that placeholder.
- When the user submits, the form posts to
/form/push/{identifier}on your Flexie host.
You can place the snippet anywhere on your page: header, sidebar, inline in an article. It does not affect the rest of the page's layout beyond inserting its own container.
If your website is on a different domain to your Flexie instance, the embed snippet's normal
<script src>request and its form submission are both permitted by browsers without extra setup, no CORS configuration is needed. CORS only matters when your JavaScript posts directly to the submit URL, which the embed snippet doesn't do.
Styling
The form ships with default styling that works on most sites. To restyle it:
- Use the Accent colour in form settings to match your brand.
- Add a Custom JavaScript block in form settings to inject scoped CSS or to hook into form events.
If you need a totally custom design, build the form on your own page and post directly to /form/push/{identifier} from your code, but you'll then be on your own for client-side validation.
What the public form does when someone submits
When a visitor clicks Submit:
- The form validates the entries in the browser (Required, Email format).
- If a reCAPTCHA is configured, a score is fetched.
- The form posts the JSON payload + any attachments to
/form/push/{identifier}. - Flexie stores the submission, runs your workflow, and waits up to 20 seconds for the workflow to produce a response if one is requested. If the workflow doesn't respond, the form's default response (the Settings, Post-submit behaviour) is used.
- The submitter sees the response: a message you wrote, a redirect to a URL, or a custom response computed by the workflow (see Writing a custom response).
The workflow listener that fires for an External form is virtual_workflow.form_submit, and the submission's field values appear in your workflow steps as {{ __data.form_submission.<field key> }}. See Forms in workflows.
Spam protection, Google reCAPTCHA v3
External forms can use Google reCAPTCHA v3 to filter out abusive submissions. v3 is invisible: there is no checkbox or image puzzle. It scores each submission from 0.0 (almost certainly a bot) to 1.0 (almost certainly human) and Flexie rejects anything below 0.7.
To turn it on
- Get a reCAPTCHA v3 site key and secret key from Google (
https://www.google.com/recaptcha/admin). Choose reCAPTCHA v3 (not v2), and register the domain(s) you'll embed the form on, including your Flexie host if visitors will see the form at/form/{identifier}. - Open the form's Settings.
- Turn on Add Google reCAPTCHA.
- Paste the Site key and the Secret key.
- Save and republish the form.
From that point on, every submission is scored before the workflow runs. Submissions below the threshold are rejected with an error response and never trigger the workflow.
When reCAPTCHA isn't enough
- It scores automated submissions; it doesn't stop a real human filling in rubbish.
- It needs JavaScript, so it doesn't help against headless submissions to
/form/push/{identifier}direct. - For high-risk forms (anything that auto-creates a record with permissions or triggers paid actions), pair reCAPTCHA with workflow-side checks. For example, look up whether the submitted email is on a known-bad list before creating the lead.
File uploads, allowed types and limits
If a File Upload field is on your form, the user picks file(s) and they are sent up to Flexie when they submit.
Allowed file types
The default allow-list is, broadly, office documents, common images, and text:
- Documents:
pdf,doc,docx,xls,xlsx,ppt,pptx,txt,csv - Images:
jpg,jpeg,png,gif - (Plus a handful more; your administrator can confirm the exact list for your account.)
Files outside the allow-list are rejected at upload time with an error to the submitter.
Multiple files
A File Upload field can be set to single file or multiple files via the field's settings, see Creating a form. With multiple files, the user can attach as many as the form's overall size budget allows.
Image optimisation
If the form has Optimise uploaded images turned on, image attachments (jpg / jpeg / png / gif) are converted to a smaller web-friendly format on upload. This saves storage and makes downloads faster. The original file name is preserved in the submission record; only the storage format changes.
Size limits
Per-file and per-form size limits are set by your account administrator and are ultimately bounded by your hosting configuration. If you need to accept very large files (e.g. multi-GB videos), ask your administrator to confirm what your current cap is. Most accounts use the default of "modest documents and images".
Analytics
Add tracking IDs in the form's Settings to fire events on every submit:
- Google Analytics tracking ID, emits a form-submit event whenever someone successfully submits. Set Anonymise IP if you want GA to drop the last octet of the visitor's IP (GDPR best practice).
- Facebook Pixel ID, fires a
Leadevent whenever someone submits, so the conversion shows up in your Meta ads dashboard.
Both are optional and independent.
GDPR and legal basis
External forms must declare a legal basis for processing the data they collect. You choose this in the form's Settings. Options include Consent, Contract, Legal obligation, Vital interests, Public task, Legitimate interests, and Pre-contractual measures. The chosen basis is recorded with every submission.
For consent-driven forms, add a GDPR Consent field type to the form itself (see Creating a form) and gate the Submit button on it being ticked.
Private external forms (signed URLs)
If you want the form to be available only via a time-limited, signed link (for example you've emailed a specific person an "update your details" form that should expire in 7 days):
Mark the form as private in its Settings.
Generate signed URLs using
signUrl(...)in a Flexie Scripting expression. For example in an email template:{% set link = signUrl("https://your-flexie/form/" ~ alias, 168) %} <a href="{{ link }}">Update your details</a>(168 = 7 × 24 hours.)
A private form rejects any visit that doesn't carry a valid, in-date signature in the URL.
What gets stored for each public submission
Every public submission writes a row that holds:
- The form it belongs to
- The submitted values (as JSON)
- Any uploaded attachments (their stored URL and original filename)
- The submitter's IP address, and an automatically-derived country, region, city, ISP / organisation from that IP
- The submitter's user agent (which browser they used)
- The exact submission timestamp
You view these on the form's Submissions page (/forms/external/submissions/{formId}), see Submissions.
Quick checklist before going live
- Form is published.
- reCAPTCHA keys are filled in (for any form accepting real public traffic).
- The form has been submitted at least once as a test.
- The workflow that fires on submit is published and was tested with a real submission.
- The form's default post-submit message or redirect makes sense for the case where the workflow doesn't override it.
- Analytics tracking IDs are in (if you want submit conversion tracking).
- Legal basis is set.
Next steps
- Submissions: viewing what has come in.
- Forms in workflows: making the submission drive an automation, with a custom response.
- Internal forms: the other flavour of form.