The Increased complexity in the Contact Centers industry, cold calling sales, inbound marketing and a lot more within the telecommunications and sales mixture, has brought us to develop an integration with the leading VoIP PBX/Asterisk platform.
The below is a simple and basic setup for you on how to add extensions/phones (Users – in the VoIP domain an extension is a user or a phone number in which you use to call and get called).
Let’s suppose you already have all Trunks and routing rules already set up and configured properly, so you now have to add users in FreePBX.
Add a User in FreePBX
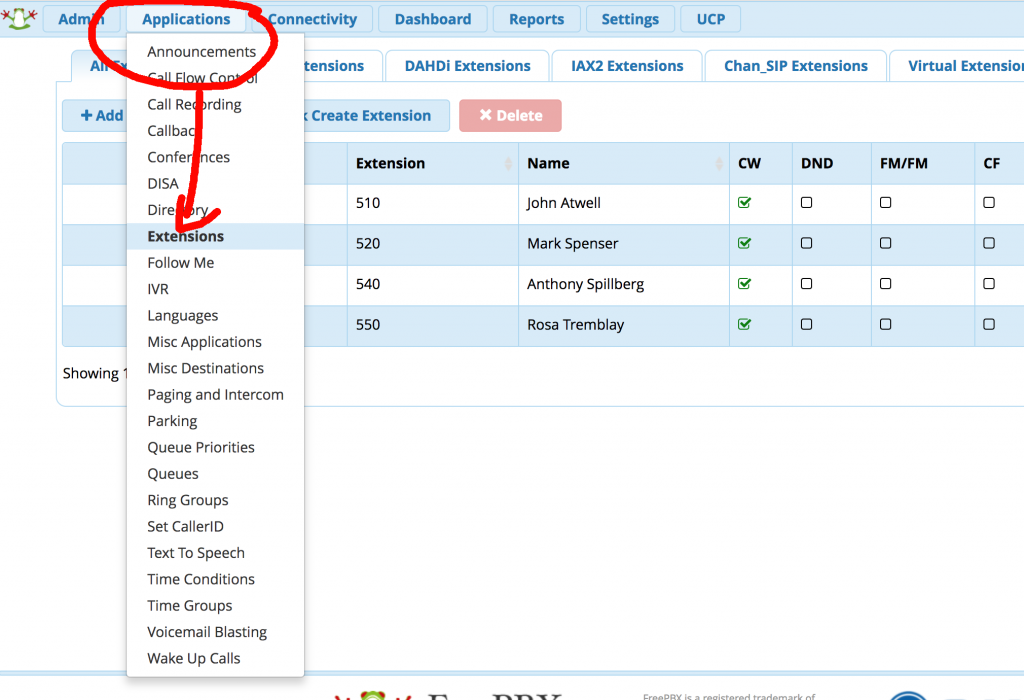
As you can see from the Screenshot below, you can add users by navigating on “Applications” -> “Extensions” in the top menu.
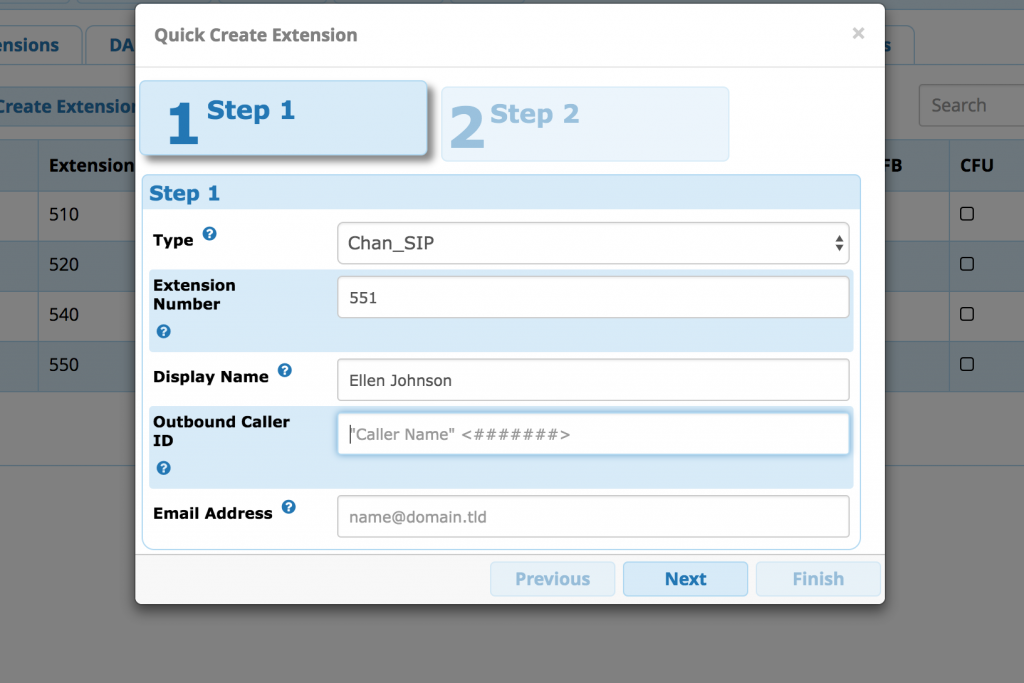
Then, on that screen you would get the list of the already existing extensions/users if any. On top of that list, you can click on the “Quick Create Extension” as in the screenshot below, it would open a small window, in which you can just add you user full name, and the extension number. In this case the extension number is automatically suggested by the system as an incremental number from the last one you have used. You have to make sure you choose the “Chan_SIP” as the Type, as its the most used protocol for VoIP communications, this does not mean you can not use other available protocols, but this would depend on what technology and protocols supports your end infrastructure.
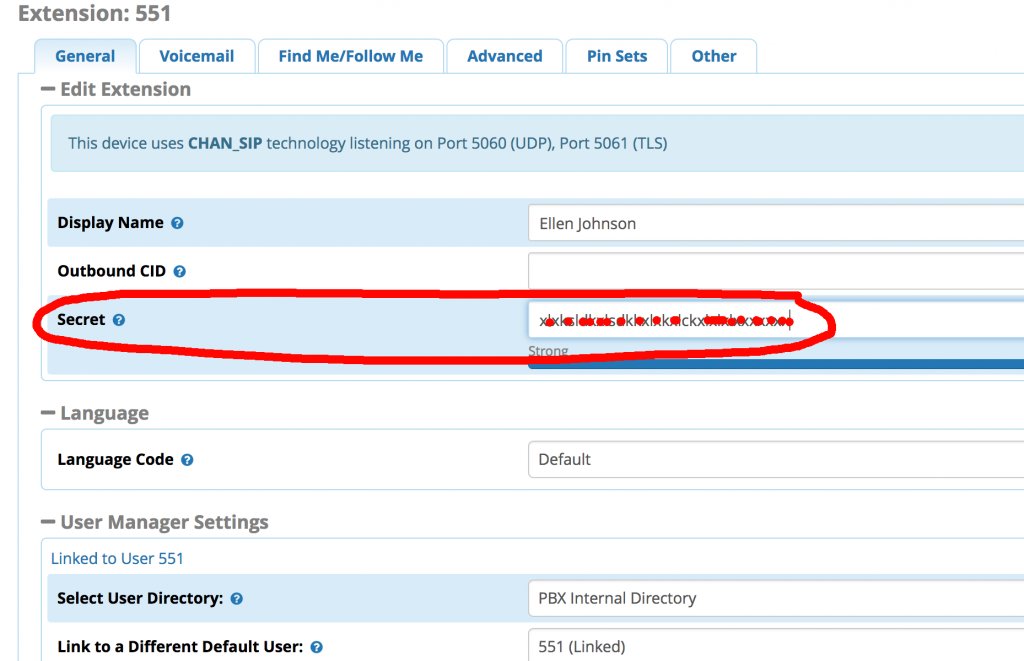
Click Next, in the second step, leave every thing as default values, and thats all, you are done with creating the extension/user. From the add procedure you simply created the user, but you need the password for that extension, so you can go straight into the main list where all the created extensions are, and edit the one you just created. In the extension details you would see that the system automatically generated a safe password for us to use, which is labeled with “Secret” like in the screenshot below.
Integration with Flexie CRM
Now that you have configured all your extensions/users, the same extension number must be within the CRM, so in this way we can take advantage of the Click to Call with the CRM.
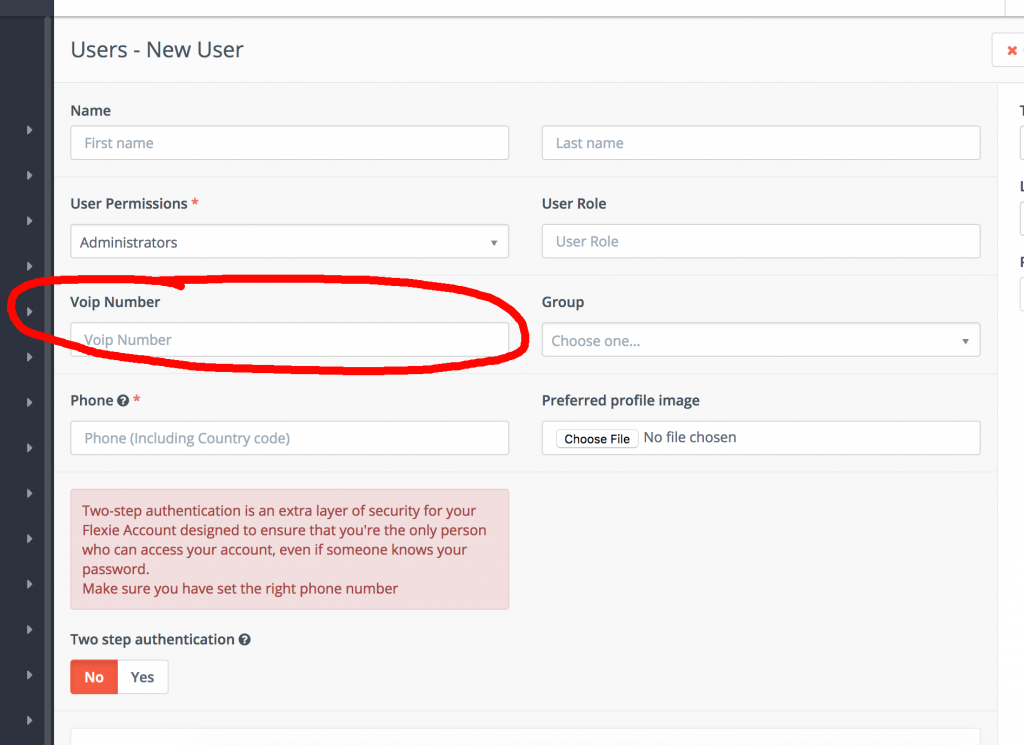
In the screenshot below, you can see that in the user details on Flexie CRM, its a field named “VoIP Number”, in this field, you have to put the same number (ex. 551) you created on the FreePBX extensions for a specific employee/user within your company.
So this mapping of the same extension number into the user account, is used by several parts within the CRM, one of them as mentioned above is the Click to Call ability from the CRM.
Click to Call is done by configuring the custom field handling the phone number within your entity, in a typical case a phone field in the Leads entity.
On the phone number field, you can configure the Click to Call URL, which would start 2 calls from your FreePBX, one is toward the lead you want to call, and another one is toward the user, the one which is clicking the call lead button. In the screenshot below, you can see how this is configured on a Phone Field.
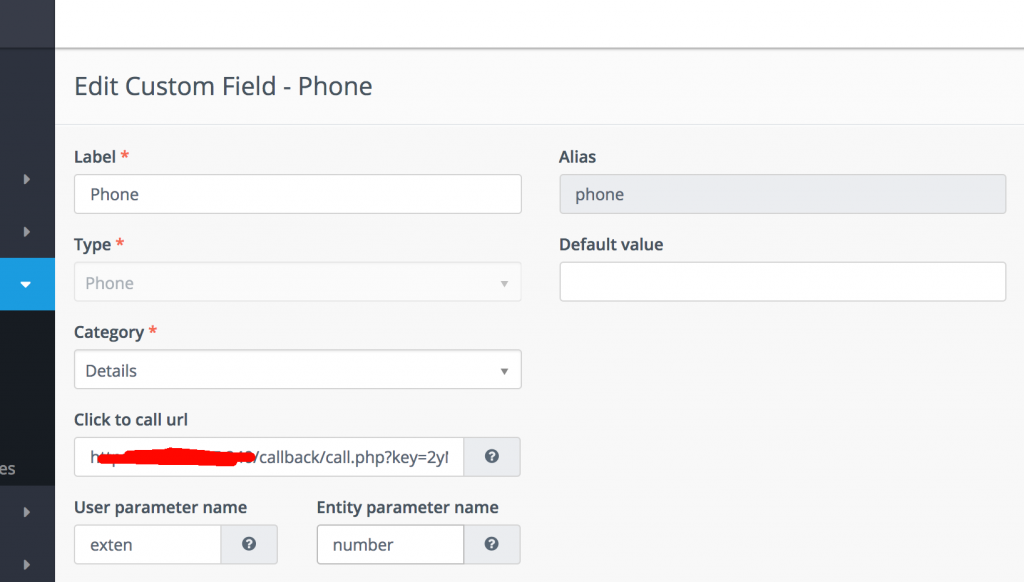
This would typically be configured from the support team handling the FreePBX installation, but basically there are 3 fields to configure, the Click to call url, which is the URL of the click to call Flexie CRM module within the FreePBX, user parameter name, which means the name of the query string parameter used on delivering the CRM user VoIP number, and the number parameter is the actually number you are going to call, typically the Lead number.
SMS 2 Talk
A very interesting feature in the now days marketing techniques is the usage of the SMS old technology to deliver a very small message that would trigger the curiosity of the lead. Since the SMS open/read rates are proven to be the most higher in the communications methodologies, we can take advantage by injecting a special URL within the SMS message, from which, if clicked by the lead, would trigger a 2-way direction call through Flexie CRM. The call placed by Flexie CRM using the FreePBX module would connect the contact center agent with the lead.
In more simple words, from Flexie CRM, you can start a SMS 2 Talk campaign by sending SMS to your leads, in the frequency and volume that you define, and in each SMS would be a unique short link. If the lead clicks the link (obviously the link would be clicked if your message is properly constructed and it would trigger the lead curiosity) – Flexie CRM would call both the lead number and the available agent within your contact center.
This is a very effective technique because you are not forced to do outbound cold calling calls and end up calling not-interested leads. In this case the campaign would make more sense to be named as inbound marketing due to you receiving calls from the interested leads only.
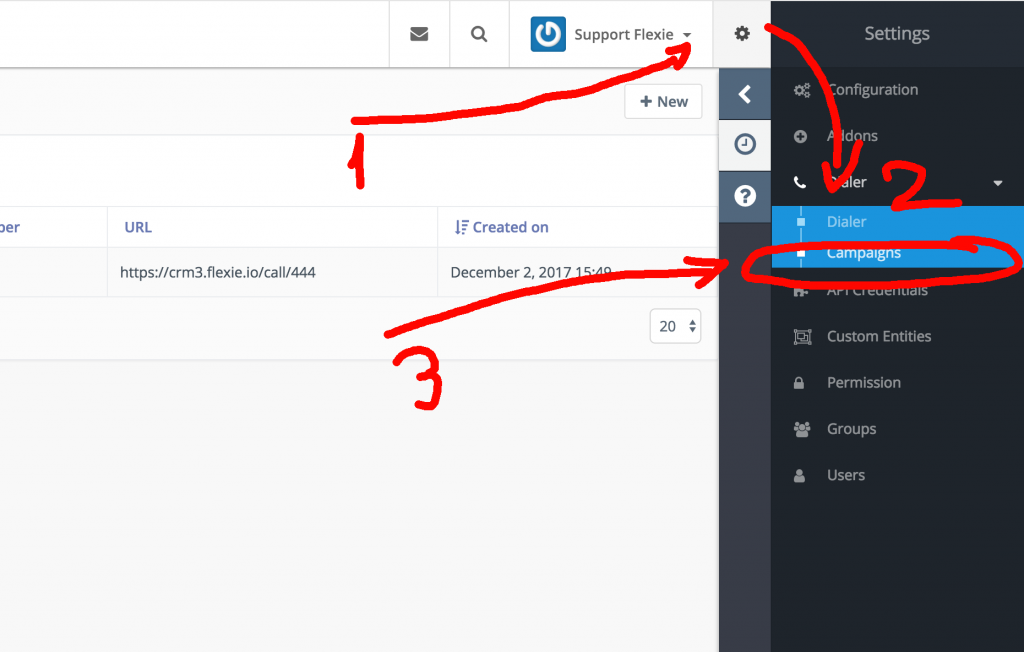
You can create the SMS 2 Talk campaign by going into the Dialer module in Flexie CRM, and then in the Campaign section, as in the screenshot below.
By clicking on the “New” button top-right, the Campaign form needs to be filled. You have to add the following:
1. Name (Campaign name)
2. Queue Number (Keep reading, down below its the explanation of the Queue Number)
3. Public Content (You can add anything here, a full landing page can be added, as it allows to add html content, so you can just add anything. This is what the lead would see when clicking the URL within the SMS, so its landing page which fits your campaign detailed message and content)
4. Description (Just a text field for adding notes that explains what the campaign does)
The queue number on the campaign is just a VoIP number, that Flexie CRM would call to connect the lead to the available agent on your Contact Center. This VoIP number is configured in the FreePBX section. From there you can create a queue which would have all the agents you have already assigned for this specific campaign.
You can create the queue in FreePBX by navigating on the top Menu “Applications” -> “Queues” , then from there you can click “Add Queue”.
After clicking on the Add Queue button, the following form needs to be filled, as in the screenshot below.
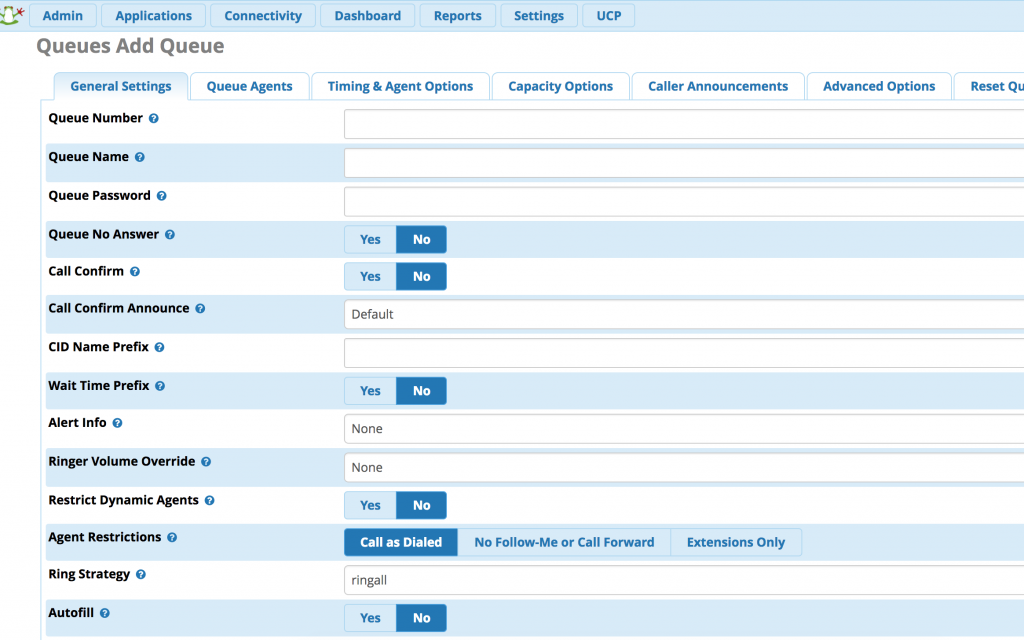
The most important field you need to set are the following:
1. Queue Number (The number used to dial the Queue, and then the queue itself would pick up an available agent and would pass the call)
2. Queue Name (Just a name for your reference)
3. Ring Strategy (You can choose whatever fits your needs, but typically in a basic scenario you would want to choose the “fewestcalls” which means the queue would pick up an available agent with less calls made so far)
4. Fail Over Destination (You may want to trigger an IVR if there is no available agent from the queue and by doing so, on that IVR you can use different options such as changing the status of the lead as callback in Flexie CRM, or other options based on you specific case)
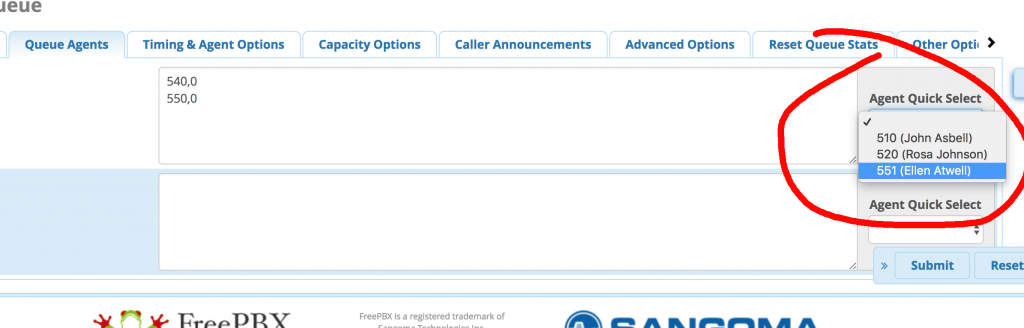
Once this is set up, you have to go on the “Queue Agents” tab, from the same screen. From there you can add the extensions/users you need to be part of this queue.
For adding extensions/users into the queue you have to choose from the “Agent Quick Select” dropdown menu, as in the screenshot below.
So now that you have all the needed components, you have to start your SMS using the Flexie Workflow module.
Send SMS from Workflow
First off, you would need a smart list, which you would have to create for having it as the Workflow Source, for doing so, you can you can read Creating a smart list and applying filters.
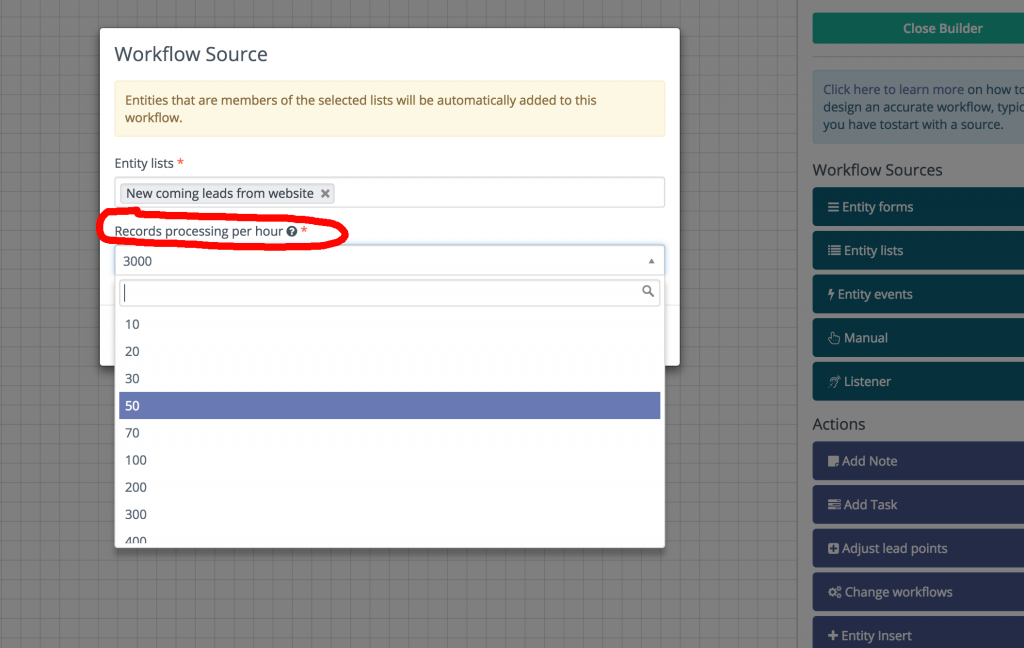
In the workflow section, create a new workflow, and click on the Top Right button “Launch workflow builder”, from there you have to start the workflow tree by selecting the smart list of the leads you already have. On that screen you have the option to limit the records processing per hour, as in the screenshot below. This would act as the SMS throttle control for the frequency you may want to send based per your Contact Center capabilities.
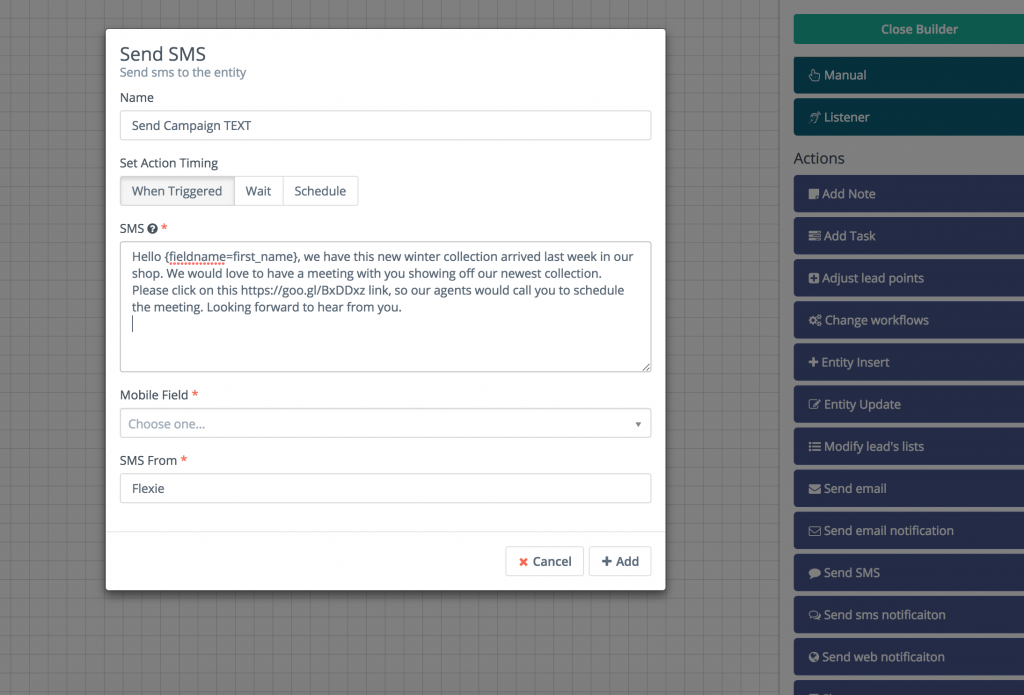
Then this Source in the Workflow, you can connect it with the “Send SMS” Action, which would actually send your Campaign Message.
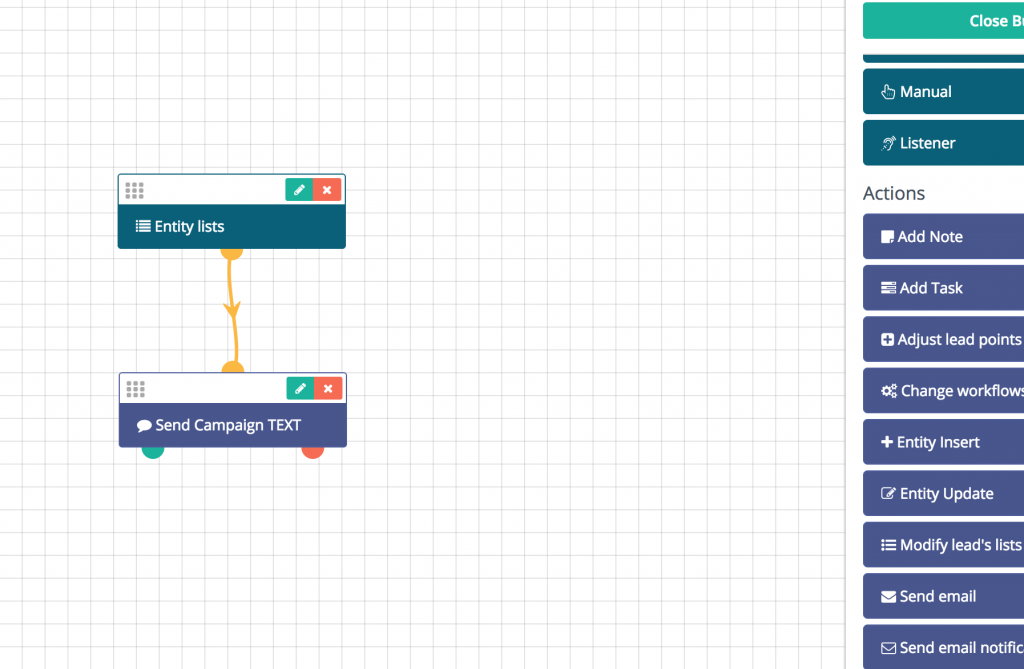
So your completed Workflow would look like the following Screenshot.
Once you save it, then it would start sending the SMS at the frequency you set on the list Source above. However, if for any reason you want this workflow to stop, you can do so in the details screen, but setting the “Published” option as “No”, You can do the same on the on/off switch you have within the main Workflows list.
For more detailed guide on how to build an workflow, you can check it this article Working with workflow automation.
To stay updated with the latest features, news and how-to articles and videos, please join our group on Facebook, Flexie CRM Academy.