Automating repetitive tasks can save you a lot of precious time. Workflow automation is integral for marketing automation. It is a tremendously powerful tool because it allows you to track everything that’s happening within the CRM in real time. You can also execute actions based on conditions you’ve set beforehand. Before we go on describing the steps you need to follow in order to build a simple workflow, let’s talk a bit about the importance of workflow automation.
Your company is growing by the day, but so are your need and tasks. New clients keep coming in. More customers mean more administrative work. How can you keep track of all your potential customers and the existing ones? How you can handle the communication process? What about nurturing leads, converting them into contacts? What about closing more deals? These are all vital elements.
Keeping notes in sheets of paper is not only obsolete, but counter-productive as well. What if you have a lot of leads? You can’t possibly send thousands of emails to a list of potential customers without a proper system. And even if you do, without a prior nurturing process, those emails will be marked as spam and will never see the light of the day. What about tasks within the company? What about communication within the company and potential customers, business partners and existing customers? What if you could automate many repetitive tasks? The answer is Flexie CRM.
Workflow automation helps you reduce your administrative work, increase team efficiency, boost sales and gain huge insight into your company. Now, how can you work with workflow automation in Flexie CRM? Below are the steps you need to follow in order to build a simple workflow:
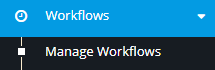
Navigate to Workflows and on the drop-down menu click Manage Workflows.
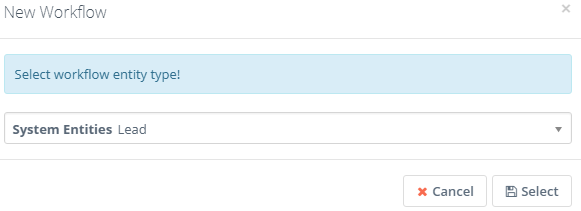
Here you can see existing workflows (if you have created one or more). Otherwise, the table will be blank. To start creating a new workflow, go to the top right corner of the screen and click on the New button.
![]()
Choose the workflow entity type (Lead, Contact, Account, Deal or a specific Custom Entity), and click the Select button. We will choose Lead as our entity type.
Name the workflow, provide a description (optional), choose a category, and then click the Launch Workflow Builder button.
![]()
In order to design a workflow, you have to start with a source. With Flexie, you can set time-based actions and execute event-based actions as well.
Below is how you can build a simple and accurate workflow:
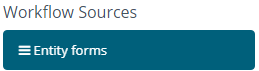
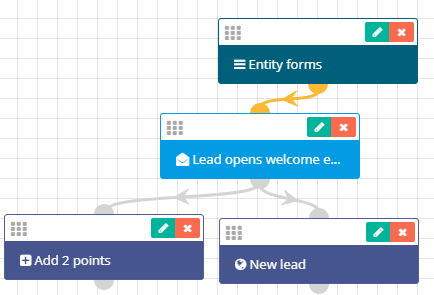
First, choose a source. In our example, Entity form will be our workflow source.
Do you want to send a welcome email to a lead that has just visited your page? Go to Send email, give it a name, set the time when the email is going to be sent and then click the Add button.
![]()
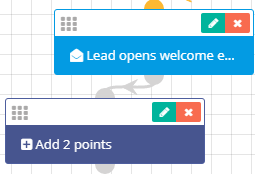
But what if you want to execute actions once the lead opens your welcome email? Go to Watch For events and click the Open marketing email event.
![]()
Say you want to check if the leads open the welcome email.
Click Add and then you can proceed to executing action bases on what the lead does. If, for example, the lead opens the email, you can add two points to it. To do this, go to Adjust lead points, set the time of the action, add the points (2 in our example), and click Add.
Or, if you want to notify the lead’s owner that the lead has open the welcome email, go to Send web notification, choose the owner type(user or a group), the timing of the action, provide a notification title and the notification message, and then click Add.
![]()
Once the lead opens the welcome email, the owner of the lead will be promptly notified.
Here’s what the workflow we’ve just built looks like:
Building a seamless and accurate workflow with Flexie is easy and quite intuitive.
To stay updated with the latest features, news and how-to articles and videos, please join our group on Facebook, Flexie CRM Academy.