Building a Workflow
Last updated 23 May 2026
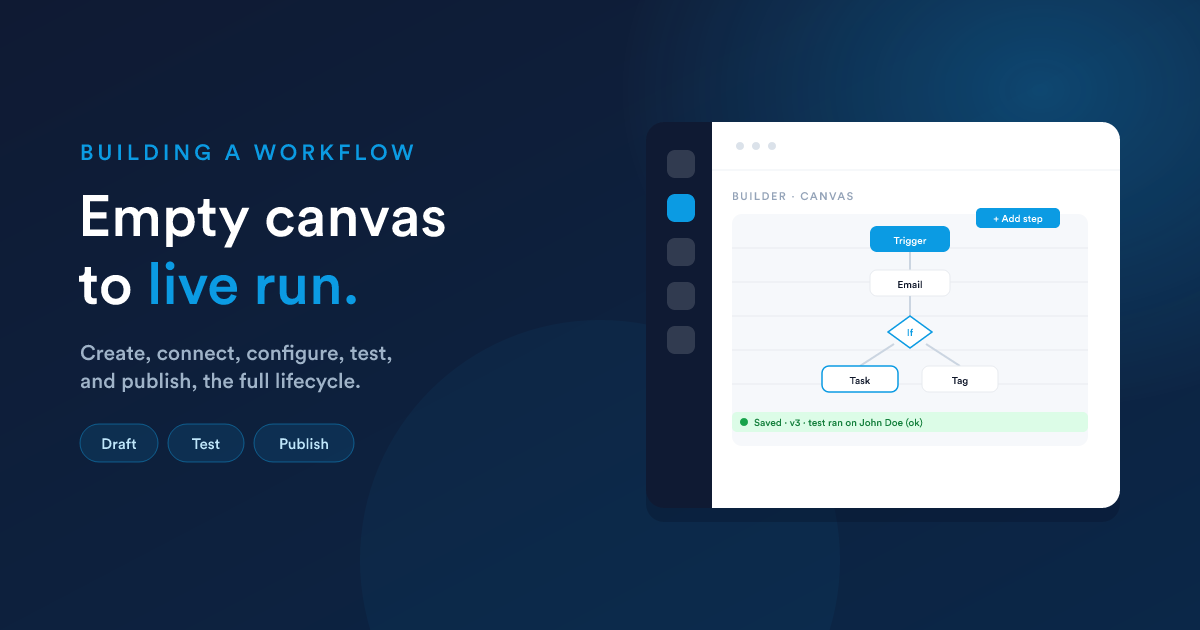
From an empty canvas to a live automation: a trigger, the steps that branch off it, and the moment you flip the switch. The Workflows overview covers the building blocks assumed below if you have not read it yet.
Step 1: Create the workflow
From the Workflows list inside your Flexie account, choose New. You set the basics:
| Setting | What it means |
|---|---|
| Name | A clear name you will recognise in the list. Required. |
| Description | Optional notes on what it does and why. |
| Record type | The kind of record this workflow runs on: Lead, Contact, Account, Deal, Case, Invoice, a custom record type, etc. This is fixed once the workflow has steps, so choose deliberately. |
| Category | Optional grouping for the list. |
| Run mode | Async (the default, background) or Sync (immediate). Explained in Runtime. Leave it on Async unless you have a specific reason. |
The source, what actually triggers the workflow, is covered in Triggers & sources. You pick this as part of setup.
Step 2: The builder canvas
Once created, the workflow opens in the visual builder: a canvas where the trigger sits at the top and steps flow downward. You build by adding blocks and connecting them.
There are three things you place:
- Actions that do something.
- Decisions that check something and split into a Yes path and a No path.
- Listeners that wait for an external signal before continuing.
See Actions & decisions for the full catalogue and how each is configured.
Step 3: Connect steps into a tree
This is the part that makes a workflow more than a checklist. Every step you add is connected to a parent step, and execution flows along those connections. The result is a tree:
Two rules govern the tree, and they matter:
- A decision's children belong to a branch. When you connect a step beneath a decision, you attach it to the Yes path or the No path. A child left unattached to either branch will never run. Always make the branch explicit.
- An action's children just follow it. Steps connected beneath an action run after it. For steps that can fail, the failure can route to a different child, see Actions & decisions.
You can place more than one step directly under the same parent. They are siblings, and they can run at the same time, see parallel execution.
The builder prevents loops (a step cannot eventually lead back to itself) and warns if a step is not connected to anything. If you leave a step dangling, it is attached to the previous step automatically and you will see a notice.
Step 4: Configure each step
Click a step to open its settings. Most fields accept Flexie Scripting, so a value can be computed from the record and from data earlier steps produced, for example the recipient address, the body of a message, or the value to write to a field. Data from the trigger and earlier steps is available as {{ __data.… }}. See Passing data between steps.
Each step can also have timing: run immediately, after a delay, or at a set date. And it can be restricted to certain hours or days. See Scheduling.
Step 5: Test before going live
Do not publish blind. Use the built-in test run to execute the workflow against a single real record and see exactly what each step would do, with a log of the outcome of every step. This is covered in Testing.
Step 6: Publish
A workflow only runs when it is published. Publishing is a toggle on the workflow. You can also set a publish window: a start date and time and an optional end date and time, so the workflow is only active during that period. Outside the window it is dormant, even if otherwise published.
The lifecycle at a glance
- Editing a live workflow is allowed. Each save creates a new version, so you can review history and roll back. See Versions & rollback.
- Unpublishing stops new runs. Records already partway through finish according to how the engine had already scheduled them.
Next steps
- Triggers & sources: choose what starts your workflow.
- Actions & decisions: the steps you place on the canvas.