Creating an Endpoint
Last updated 23 May 2026
Step 1: Create a virtual workflow
- Open the Workflows section and choose New.
- Record type: the virtual type.
- Source: Listener.
This gives you a workflow whose starting point will be the endpoint listener.
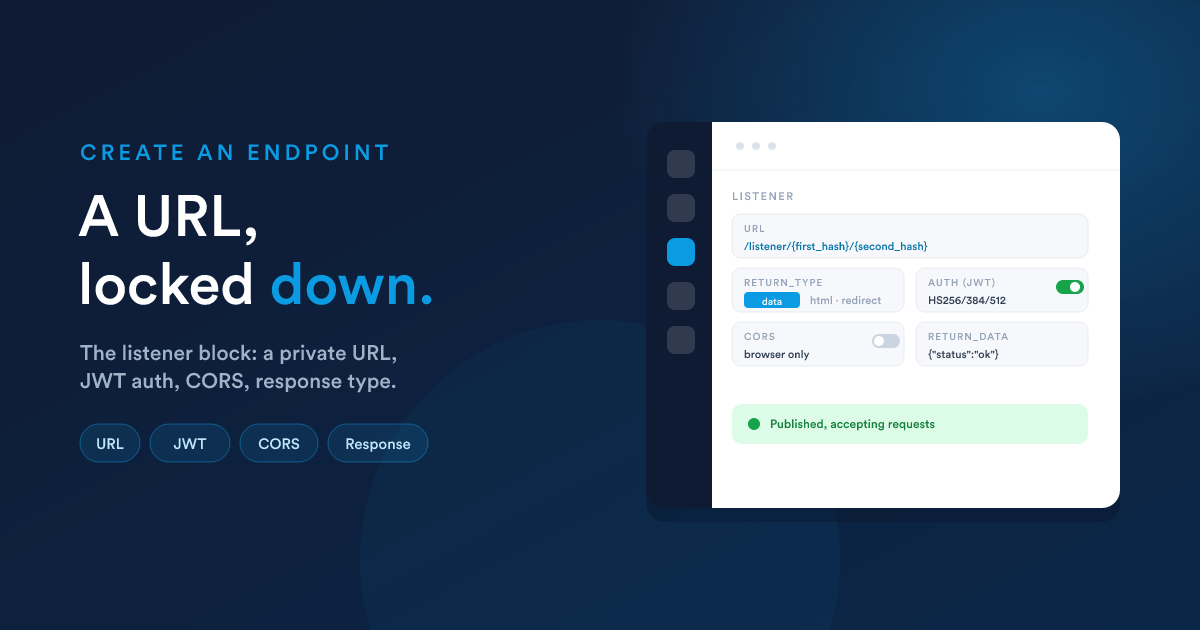
Step 2: Add the endpoint listener
On the builder canvas, add the inbound endpoint listener as the workflow's starting step. This is the block that creates and owns the public URL. It has the following settings.
The URL (read-only)
The endpoint's address is built from two automatically-generated hashes:
/listener/{first_hash}/{second_hash}
first_hashandsecond_hashare generated for you and shown read-only.- Together they form the full public URL an external system will send data to, for example:
https://your-flexie-domain/listener/a1b2c3…/f6e5d4…
Because the URL contains two long random hashes, it is effectively unguessable, but treat it as a secret and prefer adding authentication (below) for anything sensitive.
Response type (required)
return_type decides what the caller gets back. There are five options:
| return_type | What the caller receives |
|---|---|
| data | A response body you define (JSON, XML, or HTML, the type is auto-detected) |
| html | An HTML page you define |
| redirect | An HTTP redirect to a URL you define |
| continue | The response is produced later, by a step in the workflow, for dynamic replies |
| sse | A live, streamed response (Server-Sent Events) produced by the workflow |
These are covered fully in Responding to the caller. For a simple "received, thanks" endpoint, choose data and provide a short body. The matching field appears based on your choice:
- data:
return_data(the body; Flexie Scripting allowed) - html:
return_html(the HTML; Flexie Scripting allowed) - redirect:
return_redirect(the target URL; Flexie Scripting allowed)
Step 3: Add authentication (recommended)
Turn on add_authentication to require callers to prove who they are with a JSON Web Token (JWT). When enabled:
| Setting | Meaning |
|---|---|
| endpoint_key | The expected token issuer (the iss claim). Callers must present a token issued under this key. Auto-generated; you can change it. Supports Flexie Scripting. |
| endpoint_secret | The shared secret used to sign and verify the token. Auto-generated; you can change it. Supports Flexie Scripting. Rotate by changing the value. |
Details that matter when the calling system builds its token:
- Supported signing algorithms are HS256, HS384, and HS512 only.
- A 60-second clock-skew allowance is applied (so minor clock differences do not reject valid tokens).
- The caller sends the token in the
Authorization: Bearer <token>header (a plaintokenheader is also accepted). - Missing token returns 403. Invalid, expired, or wrong-issuer token returns 401.
Without authentication, anyone who has the URL can call it. With it, only callers holding a validly-signed token for your issuer can.
For the full protocol, claim shape, clock-skew handling, the
dataclaim, failure-response details, the CORS-preflight gotcha, and ready-to-adapt code samples in Node.js, Python, PHP, Go, .NET, Java, Ruby, curl, and Flexie itself, see Authentication & CORS in depth.
Step 4: Cross-origin rules (only if a browser calls it)
If the endpoint will be called directly from a web browser (from your website's front-end), enable allow_cors and list the allowed origins:
| Setting | Meaning |
|---|---|
| allow_cors | Turns on cross-origin handling (including preflight requests). |
| cors_domains | Comma-separated list of allowed origins, e.g. https://app.example.com,https://staging.example.com, or * to allow any. Supports Flexie Scripting. |
If the endpoint is only called server-to-server (the usual case for webhooks), you do not need CORS.
Combining JWT auth and CORS has a real gotcha. A browser preflight
OPTIONSrequest is rejected by the JWT check because preflight does not carryAuthorization. If you need both, route the browser call through your own back-end, or use a body-borne signature instead. See Authentication & CORS in depth.
Step 5: Build the steps, test, publish
Add the workflow's decisions and actions beneath the listener, using the incoming data as described in Receiving data, then test and publish as with any workflow (see Building a workflow).
The endpoint only works when the workflow is published. An unpublished virtual workflow's URL will not accept requests.
Finding your endpoints
The public URL is shown on the endpoint listener inside its workflow. Flexie also exposes a list of published endpoints to authorised callers via a dynamic-endpoints listing, useful for an integrating system to discover what is available.
Next steps
- Receiving data: how the request becomes usable values.
- Responding to the caller: the five response types in full.
- Authentication & CORS in depth: the JWT protocol, the CORS rules, the preflight gotcha, and code samples in eight languages.